Showing posts with label Skull. Show all posts

Saturday, April 18, 2015

Blacktip update

Quick update on a couple of fishy bits. The blacktip shark skull is now finished, and waiting for the rest of the skeleton. As I'm currently quite busy with other stuff it might be a while before I get the time to finish it, but most of it is now completely clean, and just needs to be dried properly.

Carcharhinus melanopterus skull, finished.

Partial angelfish skeleton (probably Pomacanthus sp.). The pins are holding the fins in place while they dry.

Mako shark (Isurus oxyrinchus) drying. The basihyal is missing on the picture.

Couple of chondrichthyan parts: Raja asterias pelvic fins, Carcharhinus melanopterus hyoid arch, and Squalus acanthias skull and vertebrae.

Monday, February 23, 2015

Toothy snakes

Even though I'm mostly working on fish stuff these days, I'm still working with herps sometimes which were the focus of my collecting interest when I first started cleaning skulls and skeletons. Among these, I've always been especially drawn to groups such as crocodilians, varanids and boids. I've always loved constrictor snakes and I currently have two live pythons at home, so I love them both live and skeletonized. As they're popular as pets, a lot of people are breeding a huge variety of species, so it's not that hard to get some captive bred specimens to work on, and due to their size, they can make very impressive specimens.

My two roommates: Otto (Python regius) and Raoul (Morelia bredli). Pictures are a bit old so they're a bit larger now. And yes, I love silly names.

Two species in particular have always attracted my attention for a variety of reasons: the green tree python and the emerald boa. First, they are absolutely beautiful snakes and make up a really cool example of convergent evolution. They're pretty high maintenance in captivity though, and quick biters as well, so never considered getting some live ones. Another thing they share is a fantastic looking skull.

 Emerald boa skull (Corallus caninus)

Green tree python skull (Morelia viridis)

Although they don't grow to very large sizes, they share the longest teeth found in non-venomous snakes. You just don't want to get bitten by one of these guys.


Sunday, February 15, 2015

Fishy bits

Quick update on the blacktip (here)! I'm finally getting there. Still have to clean about half of the gills, but otherwise all pieces are cleaned, whitened, and most are dried already. I should have everything clean and dry by the end of the month so I can start putting the shark back together.

Dorsal and pectoral fins. As with the smooth-hound skeleton, I decided to keep the skin on most of the fins to protect the ceratotrichia.

Caudal fin, I used the same approach here.

And a couple of pictures from other projects:

Three catsharks (Scyliorhinus canicula) skulls in the cleaning process.

Degreasing a black grouper sull (Mycteroperca bonaci). This guy is incredibly greasy and will probably require multiple acetone soaks before whitening and final assembly.

Tuesday, December 23, 2014

WIP

Been a while since I posted anything, so here are a few pictures of various specimens in the works.

Recently I was lucky to get hold of a shortfin mako (Isurus oxyrinchus) head. It's a small individual, but I was very happy about it since I've been looking for this species for a long time. Since I got it during this year's comparative anatomy practicums, I also used the opportunity to bring it to the lab, which was a lot of fun. I then did the rough part of the cleaning process when the course was over.

Speaking about chondrichthyan jaw suspension.

The cleaned skull during the whitening process.

It's been a while since I macerated anything, but I kind of forgot several specimens in the maceration tanks which are now piling up and waiting to be degreased.

Various mammal and reptile skulls waiting to be degreased.

Still in the fish department, I was also able to get a couple of really cool-but tiny heads. Without the complete body it's hard to be sure but those are probably some kind of barbelled dragonfish (most probably in the genus Stomia). They are not in very good shape and have been kept in ethanol for a while but I'm currently in the process of cleaning the skull, more on that when I'm done with them.

Barbelled dragonfish head (Stomias sp.). Awesome little critter.

I've also been skinning and drying a couple of specimens for beetle work. We have some cool facilities at the lab to dry sediments that turned out to be very useful to dry critters as well.

Blue dot grouper (Cephalopolis taeniops). Found this one at the local fish store and ate it before saving the skeleton. Very tasty, and beautiful fish that should make a nice little skeleton.

Couple of captive bred herps, a python and chameleon. It was the first time I dissected one of these and they have a fantastic anatomy. Really looking forward to work with the skeleton of this one.

And finally, still playing around with clearing and staining specimens. Still have to get better at this, but I recently completed a batch of snakes so thought I would share a pic. Hopefully I will soon have other cool cleared specimens to show. And special thanks to a friend at the lab who gave me a hand skinning all these, and more :)

Cleared and stained cornsnakes (Pantherophis guttatus) and hognoses (Heterodon nasicus).


Wednesday, October 29, 2014

Half digested baby barracuda skull

Well, maybe not quite exactly, but close. It's certainly partially digested, and I'm quite sure it's a sphyraenid, though it might be difficult to get a more precise ID based on its morphology. This guy was found in the stomach of a nicely sized small-spotted catshark (Scyliorhinus canicula) during last week comparative anatomy practicum. It's always interesting to see students' reactions when offered to investigate stomach contents, some are totally grossed out, but quite a few get really excited about it. We found all sort of things this week, mainly crustaceans, worms and small fish. I remember when I performed this same dissection as an undergrad a few years ago and found a large squid in the stomach of my specimen, a large female. I still have the beak I extracted from the half digested meal and the eggs I removed from the uterus laying around in a jar somewhere.

Partially digested sphyraenid head. Yum.

Saturday, October 11, 2014

Blue shark skull

This post is a bit overdue since this specimen has been completed for almost a year now, but I still wanted to write a few lines about it. It was my first large shark skull (and one of my first shark skulls for that matter, since I only started experimenting on numerous catshark specimens a few months later), and I made several mistakes in the process which I'll discuss a bit here.

I found this specimen quite unexpectedly while out to buy some food during the summer of 2013. I always check the fish department as well in case they might have anything of interest, and got really excited when I noticed the large shape on the stall. Although it's meat is sold on a regular basis around here (I'm located on the Mediterranean coast) it was the first time I saw the head in a shop, and the guys there were nice enough to give me the head for free.

Blue shark (Prionace glauca) head.

Close up on the snout showing the ampullae of Lorenzini. The medial rostral cartilage is also visible through the skin.

Dissection of the head, with palatoquadrate and right optic capsule exposed.

The first mistake I made with this specimen was to attempt a complete dissection of the head. While it can be done, it often leads to broken structures in the skull, since in some areas the skin is a lot tougher than the cartilage underneath, especially around the rostrum and orbital processes. Doing so, I damaged one of the preorbital processes, which are fairly developed in this species.
The second mistake was to apply too much heat to the jaw which separated at the joints. Fortunately, the teeth didn't fall out, which is also a common occurrence when too much heat is applied. This is why you can't clean shark jaws by boiling them as Quinn is doing in Jaws.

Re-articulation of the jaw joints.

The jaws can be glued back in place, and on large skulls I use wire as well for additional strength. Even then, the jaws will be much more fragile and delicate than if the ligaments are preserved. The palatoquadrate and meckel's cartilage are carefully drilled and wired with brass wire and glued back together. The same process can be used for the hyomandibulars and to glue the jaw to the chondrocranium. On large specimens, I prefer to remove the jaw from the chondrocranium for proper cleaning. This way I can also apply heat to the chondrocranium without damaging the jaws.

Gluing the hyomandibulars back in place on a blacktip reef shark (Carcharhinus melanopterus).

 Another issue with the blue shark is the tendency of the chondrocranium to warp a lot as it dries. Freeze drying might reduce this issue, but every specimens I've been able to see so far displayed a high degree of distortion.

Dorsal view of a blue shark skull, showing important distortion.

Anyway, it was still a very interesting specimen to work on. I hope to get my hands on a second one later one so I can clean it properly without repeating the same mistakes.

The finished specimen. I also kept the ceratohyals and basihyal and might glue them back later.


Tuesday, September 23, 2014

Catshark skulls and labial cartilages

Labial cartilages are widespread in modern sharks, and they are also found in their relatives: rays, chimaeras and are known in several fossil form. They are paired (up to three pairs) cartilage structures supporting the mouth corners, come in a variety of shapes and sizes and may help with suction feeding in some species.

 Skull of Squatina sp., showing the massive labial cartilages (in green). Source unknown.


Despite some references in the literature (for example Parker's 1876 work), I completely missed them in the first catshark skulls I cleaned. In Scyliorhinus canicula, there is two pairs of thin rod-shaped labial cartilages.

Skull in the cleaning process where labial cartilages have been removed.

Labial cartilages are so thin in this species, it is difficult to keep them in place during cleaning. The best option might be to carefully remove them while taking good reference pictures to be sure to put them back in the right place afterward.

Close up on the upper right labial cartilage.

Couple of finished Scyliorhinus canicula skulls with the labial cartilages in place. Scale bar: 1cm

Next step is to try to preserve the scleral rings for this species, as they are so thin they tend to shrink beyond recognition during the drying process.

References: ParkerW.K., 1876. On the structure and development of the skull in sharks and skates.

Wednesday, August 27, 2014

Greasy stuff

Grease is a prominent issue when dealing with bones for a variety of reasons : conservation (the grease might turn acidic, which can in turn damage the mineral part of the bone structure. It can also provide a growth media for mold or fungus.), aesthetic (greasy bones are usually yellow or brown, unpleasant to look at and handle), smell (ever smelled a cupboard/room full of greasy whales ?) and so forth. On the other hand some people and museums go light on the degreasing due to a belief that bones that have not been degreased hold together better in the long run. While there might be some truth in this, I think specimens must at least be superficially degreased to avoid to have bones literaly oozing grease. The amount of grease present in a specimen varies depending on a variety of factors: species, season, age, sex, etc.

I'm currently working on a couple of nicely greasy fish, so I figured it would be a nice occasion to illustrate the issue.

Flathead catfish (Pylodictis olivaris)

First one is a partial flathead catfish skeleton, straight out of the beetles (not beetled by myself). It's not overly greasy, but you can still see the various shades of yellow and brown clearly asking for some degreasing.

American eel neurocranium (Anguilla rostrata), occipital view

Here you can clearly see liquid grease oozing from the basioccipital area. This specimen was also beetled. Maceration usually gives a head start on degreasing over beetle cleaning but results in the disarticulation of the specimen.

Mahi mahi (Coryphaena hippurus) neurocranium degreasing

I always use acetone to degrease fish material. It should be handled with care but it works very well for small vertebrates. Other degreasing techniques, especially a prolonged soak in warm water and detergent are more appropriate for larger specimens.

Tuesday, July 1, 2014

Blacktip shark

I recently started to work on a very exiting project: a complete blacktip reef shark (Carcharhinus melanopterus), an aquaria casualty which was donated to the lab a few years ago and which has been sitting in the freezer since then. It's a small male (under 1 m long) and the head was cut off a few years ago as well, probably due to storage issues. Fortunately (and contrary to what is suggested by the picture below), the branchial apparatus was not-or only very little damaged in the process. However the scapulocoracoid is cut in half.

Head of the specimen as it was stored.

I took care of the head first. Cleaning was pretty straightforward using the method I already outlined on this blog (more detailed protocol to come later). I saved the scleral capsules, optic pedicels, and the complete branchial apparatus, including the extra branchials.

Cleaned and wet neurocranium. Note the optic pedicel (arrows) which articulates with the scleral capsules and help to move and stabilize it. Scale bar: 1cm.

The optic pedicels had to be removed since they tend to dry poorly. I treated them separately and will reattach them later.

Scleral capsule. Scale bar: 0,5cm. The hole is the optic foramen.

The scleral capsules are often completely overlooked on chondrichthyan skeletal preparations, which is a shame since they are very cool and interesting little pieces of cartilage.

Finished neurocranium. a: dorsal view, b: palatine view, c: lateral view. Scale bar: 1cm. The optic pedicels have been removed to be dried separately, due to their tendency to shrink and warp badly.

So far this specimen is a delight to work with since it is showed very little warping and shrinking (the main issues when dealing with cartilage skeletons) compared to other chondrichthyan species I've worked on (more on that later) during the drying process.

Neurocranium and jaws being coated with Paraloid B-72.

I usually don't coat my finished specimens, be they bone or cartilage, with anything since I am very careful with them, and most are stored either in specimen boxes or in display cases. However since this shark is going to be part of the lab teaching collection (we don't have a museum over here) I felt it needed to be properly protected. To do this I soaked or coated every piece of cartilage with Paraloid B-72, an acrylic resin soluble in acetone, which can be used either as an adhesive or as a consolidant on a wide variety of specimens, from skulls to ceramic objects.

 The rest of the body, still frozen.

About half of the gill apparatus is now clean and dry as well, so I just need to clean the rest and rearticulate everything. Next will be the rest of the body, which should be pretty straightforward, since it's basically only fins and vertebrae. More pictures later, so check back for updates on this specimen.

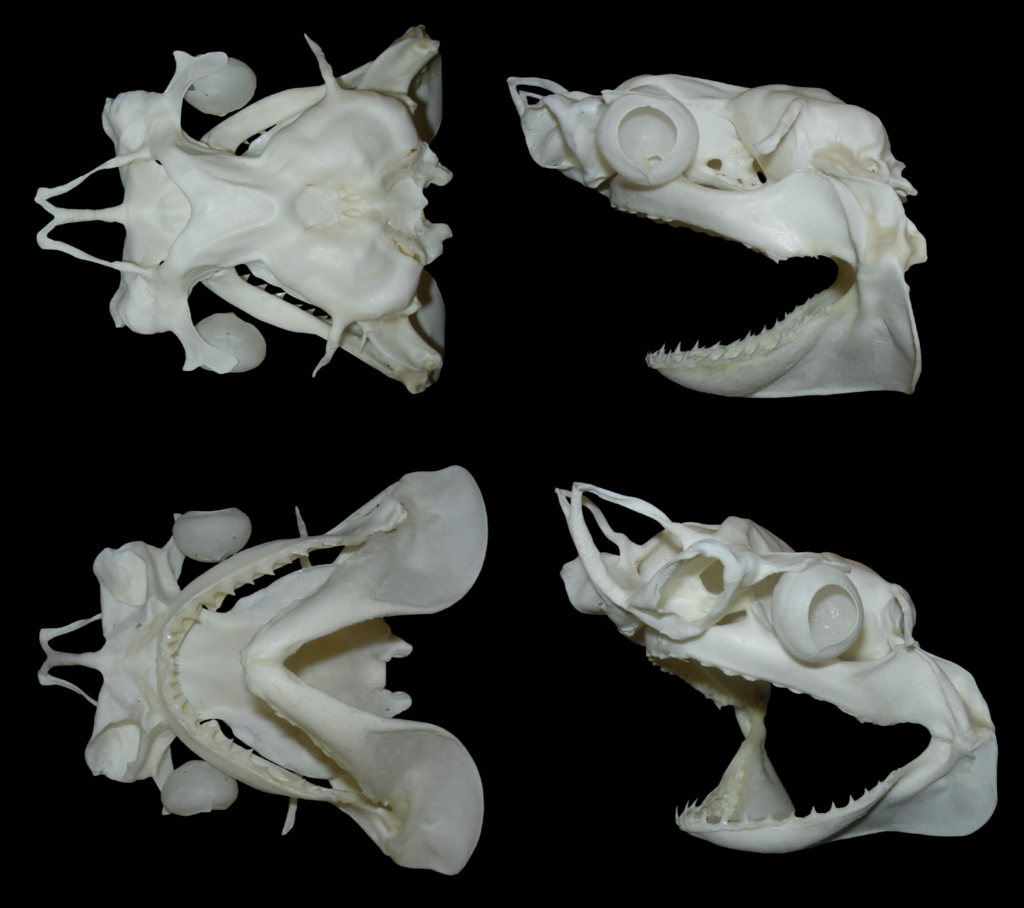
Thursday, February 13, 2014

Quick one

My work area with a variety of herps and fish

Busy right now, new stuff coming soon!


Tuesday, January 14, 2014

Small spotted catshark skulls

I've been cleaning a few small spotted catshark (Scyliorhinus canicula) skulls lately, and took some pictures to illustrate various stage of the cleaning process.

The heads prior to preparation. All of them are under 10 cm long.

Step 1: The heads are soaked in very hot (but not boiling!) water for a few hours. The water may need to be changed a couple of times as it cools and gets cloudy.

Step 2: Scraping. As the heads soak in hot water, the tissues are scraped using a scalpel and a fine pair of tweezers. 

During the scraping process, care should be taken not to disconnect the hyomandibulars, ceratohyals and basihyal if those are to be kept with the skull. On larger skulls those might be disconnected for easier handling, but on small skulls, it is easier to keep them attached. The nose area is also very delicate due to the small cartilage flaps in the nasal capsules, and to the rostrum which consist of 3 small unconnected cartilage rods in this species.

Step 3: Whitening and further scraping

Once the initial scraping is finished, the skulls are transferred to a mix of diluted H202 and ethanol. This step will whiten the specimen, and soften the remaining tissues which can be scraped further, leaving a very clean specimen. They are then rinsed thoroughly in hot water and transferred to 95% ethanol.

Step 4: Drying. 

The most common technique used to dry cartilaginous material is freeze drying. It can take some times, but restricts warping of the cartilage to a minimum. I'm still new to this technique however, and these particular specimens were dried in very strong ethanol for a couple of weeks. Note that the hyomandibulars separated from the chondrocranium on the above specimens. This will happen if the specimens are scraped and/or handled too much during this step, and they'll need to be glued back later on.

Finished specimens.

Multiple view of a finished specimen. The hyoid arch was kept in place. In order to avoid warping, small perspex sheets were used to hold the rostrum during the final air drying stage.

I'm basically using the same process, with only minor variations on all the chondrichthyan specimens I'm working on, but need to look further into the freeze drying technique in order to reduce warping.


Monday, December 9, 2013

Sharks, skates and fish heads

Quick update on the smooth-hound shark of the first post. Part of the skeleton is now clean and drying.

Here is a quick labelled picture with some cleaned parts. The fins are dried between clear acrylic sheets to keep them flat. 

I still have to clean most of the fins, the jaws, and of course the branchial apparatus which is the most delicate and fragile part of this kind of skeleton. Will post updates on this later.
Also completed a couple of skate (Raja asterias here) skulls for some friends. Just shipped these three to the Netherlands.

Two female and one male skulls of R. asterias. Note that the specimen on the right is missing the labial cartilages, which is due to the way the specimen was handled at the fish shop.

Currently working with a lot of small chondrichtyan, so I'll probably make a post about cartilaginous skull cleaning sometimes soon.

Other things include a recently cleaned european hake (Merluccius merluccius). This is just to show how a macerated (and degreased and whitened) fish skull looks like. These are pretty straightforward to reconstruct, and should look like this when finished:


European hake skull (M. merluccius) macerated (top) and reconstructed (bottom). Note that I made a mistake with the upper jaw, which should be positioned higher, in direct continuity of the tip of the neurocranium.

And finally, on my regular visit to a nearby fish shop, I was extremely excited to find this fish:
Fresh (and tasty!) atlantic stargazer (Uranoscopus scaber).

It's a stargazer, named after its upward looking eyes. This is a really cool fish for several reasons: they are venomous (they sport a couple of nasty spines in the opercular region, one is visible in the picture, just above the right pectoral fin), and are capable of bioelectrogenesis (ie is capable of generating electricity, just like the electric eel and the electric ray). They also possess an incredibly armored skull, just like on this picture:

U. scaber skull. This skull is in my collection, but was not cleaned by me. The venomous spines are clearly visible.

And on top of that, they taste really nice. Also got a black scorpionfish (Scorpaena porcus), greater weever (Trachinus draco) and a sea robin (still have to look up the proper ID for this one) along with the stargazer, and they should all make great specimens once cleaned.