Wednesday, August 27, 2014

Greasy stuff

Grease is a prominent issue when dealing with bones for a variety of reasons : conservation (the grease might turn acidic, which can in turn damage the mineral part of the bone structure. It can also provide a growth media for mold or fungus.), aesthetic (greasy bones are usually yellow or brown, unpleasant to look at and handle), smell (ever smelled a cupboard/room full of greasy whales ?) and so forth. On the other hand some people and museums go light on the degreasing due to a belief that bones that have not been degreased hold together better in the long run. While there might be some truth in this, I think specimens must at least be superficially degreased to avoid to have bones literaly oozing grease. The amount of grease present in a specimen varies depending on a variety of factors: species, season, age, sex, etc.

I'm currently working on a couple of nicely greasy fish, so I figured it would be a nice occasion to illustrate the issue.

Flathead catfish (Pylodictis olivaris)

First one is a partial flathead catfish skeleton, straight out of the beetles (not beetled by myself). It's not overly greasy, but you can still see the various shades of yellow and brown clearly asking for some degreasing.

American eel neurocranium (Anguilla rostrata), occipital view

Here you can clearly see liquid grease oozing from the basioccipital area. This specimen was also beetled. Maceration usually gives a head start on degreasing over beetle cleaning but results in the disarticulation of the specimen.

Mahi mahi (Coryphaena hippurus) neurocranium degreasing

I always use acetone to degrease fish material. It should be handled with care but it works very well for small vertebrates. Other degreasing techniques, especially a prolonged soak in warm water and detergent are more appropriate for larger specimens.

Friday, August 8, 2014

Pink teeth

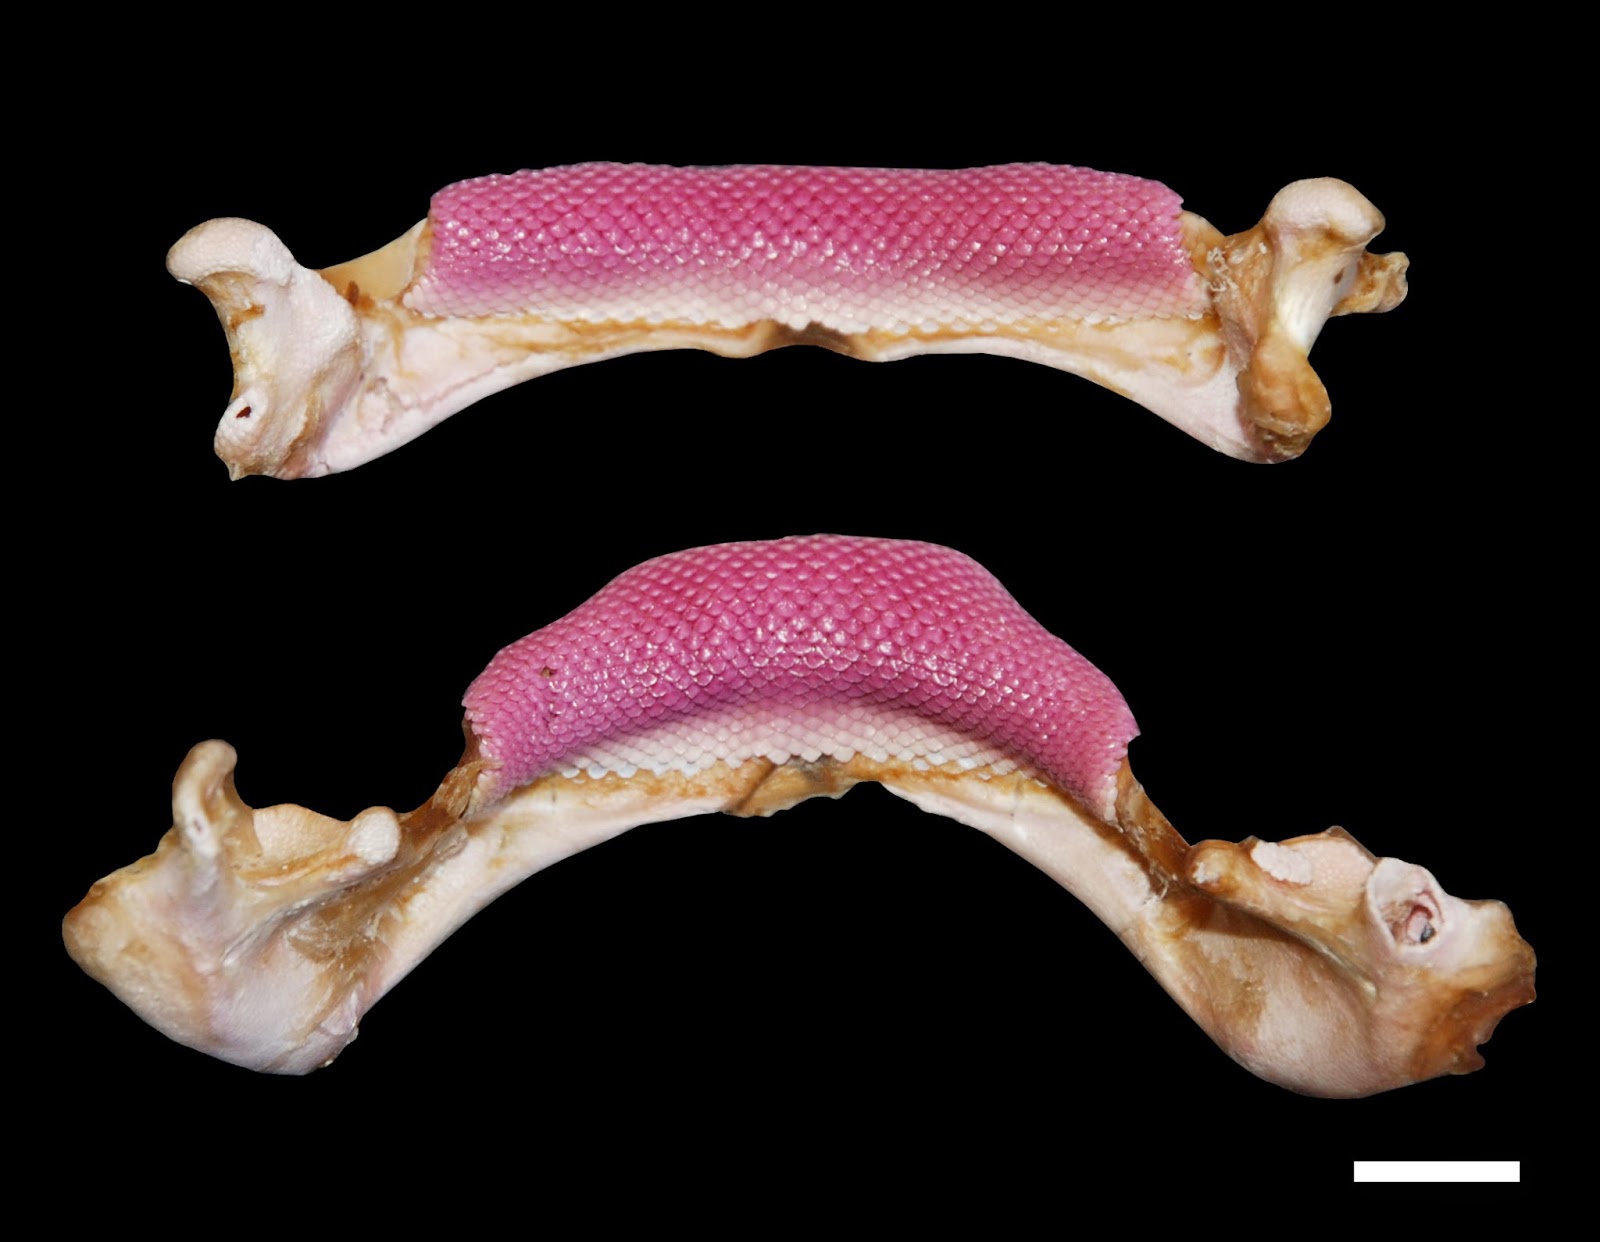
I recently came across this set of jaws from a Tortonese's stingray (Dasyatis tortonesei, which is probably invalid by the way) and was very surprised by the pink color of the teeth. It apparently not an uncommon occurrence in this species and is supposedly related to their diet, but I don't have any info/idea so far of what may be causing the the teeth to turn pink like that. For the little story, fishermen catching these apparently call them "whore rays" since they look to be wearing way too much lipstick.

D. tortonesei jaw, labial view. Scale bar: 1 cm

 D. tortonesei jaw, labial view. Scale bar: 1 cm

And while doing my regular fish shop round the other day, I found a couple of these guys.

 Red bandfish (Cepola macrophthalma) heads.

They are red bandfish, a small burrowing species found mainly in the eastern Atlantic and Mediterranean sea. First time I saw some despite them being regularly caught for those. They should have nice little skulls, and I might try to clear and stain a couple as well, more on that later.


Tuesday, July 1, 2014

Blacktip shark

I recently started to work on a very exiting project: a complete blacktip reef shark (Carcharhinus melanopterus), an aquaria casualty which was donated to the lab a few years ago and which has been sitting in the freezer since then. It's a small male (under 1 m long) and the head was cut off a few years ago as well, probably due to storage issues. Fortunately (and contrary to what is suggested by the picture below), the branchial apparatus was not-or only very little damaged in the process. However the scapulocoracoid is cut in half.

Head of the specimen as it was stored.

I took care of the head first. Cleaning was pretty straightforward using the method I already outlined on this blog (more detailed protocol to come later). I saved the scleral capsules, optic pedicels, and the complete branchial apparatus, including the extra branchials.

Cleaned and wet neurocranium. Note the optic pedicel (arrows) which articulates with the scleral capsules and help to move and stabilize it. Scale bar: 1cm.

The optic pedicels had to be removed since they tend to dry poorly. I treated them separately and will reattach them later.

Scleral capsule. Scale bar: 0,5cm. The hole is the optic foramen.

The scleral capsules are often completely overlooked on chondrichthyan skeletal preparations, which is a shame since they are very cool and interesting little pieces of cartilage.

Finished neurocranium. a: dorsal view, b: palatine view, c: lateral view. Scale bar: 1cm. The optic pedicels have been removed to be dried separately, due to their tendency to shrink and warp badly.

So far this specimen is a delight to work with since it is showed very little warping and shrinking (the main issues when dealing with cartilage skeletons) compared to other chondrichthyan species I've worked on (more on that later) during the drying process.

Neurocranium and jaws being coated with Paraloid B-72.

I usually don't coat my finished specimens, be they bone or cartilage, with anything since I am very careful with them, and most are stored either in specimen boxes or in display cases. However since this shark is going to be part of the lab teaching collection (we don't have a museum over here) I felt it needed to be properly protected. To do this I soaked or coated every piece of cartilage with Paraloid B-72, an acrylic resin soluble in acetone, which can be used either as an adhesive or as a consolidant on a wide variety of specimens, from skulls to ceramic objects.

 The rest of the body, still frozen.

About half of the gill apparatus is now clean and dry as well, so I just need to clean the rest and rearticulate everything. Next will be the rest of the body, which should be pretty straightforward, since it's basically only fins and vertebrae. More pictures later, so check back for updates on this specimen.

Tuesday, May 20, 2014

Ink and labels

Labelling specimens may seem pointless when you have a couple of skulls on a shelf, but it becomes absolutely essential when you start to have specimens all over the place. And while you might think that the choice of the pen you use to write down each specimen ID doesn't matter, it actually does. I recently realised that the ink on the labels on some of my specimens was starting to fade, probably due to light exposure. Turns out commercial pen should be avoided, and that "archival pens" (using pigment based ink instead of dye based ink) are much more suited for that purpose. So you might want to consider this when labelling your specimens, especially since light exposure is not the only thing that might threaten your precious identification system!

Label of a kitefin shark (Dalatias licha) jaw where the ink has faded due to light exposure.

This and other similar issues are covered in a very interesting poster by Amy Davidson, Samantha Alderson & Marilyn fox that can be found here.


Saturday, May 10, 2014

Rattlesnake

I'm currently working on a large (c. 1.3 m) timber rattlesnake (Crotalus horridus) for a veterinarian. The specimen was in great shape, and I didn't notice anything special when I dissected and skinned it prior to cleaning. However, once cleaned I was very surprised by the bony growth present on numerous vertebrae, sometimes completely locking them together. I still have to do some research, but from what I read and discussed with a couple of people, they might be some kind of cancerous lesions. The skull also exhibits minor deformations.


Multiple views of various vertebral segments. Only the most serious deformities are pictured here. Scale bar=1 cm.


Several views of the articulated vertebral column.

The right dentary also exhibits slight deformation.


Thursday, April 10, 2014

Hedgehog take two

Remember the hedgehog skeleton I posted a few months ago? Well, it was badly damaged by careless students soon after. This was partly my fault because I articulated with as little wire as possible (all carefully hidden) and no additional support, for a free standing finished mount despite the knowledge that it would be used in zoology practicums and it wasn't meant to be a display only specimen.
That being said, it's also due to the incredible carelessness of some students when handling natural history specimens. The need to handle those properly and carefully, especially when it comes to teaching collections which are used by generation of students, cannot be stressed enough.
Well, lesson learned, and I spent some time repairing it and reinforcing it with wires and additional support. Unfortunately, a toe was lost in the process.

I also added a brass plaque to the base, which always adds to the finished piece I think.

 Right side view

 Detail of the scapular belt area

 Detail of the right leg


Despite the fact that I don't like at all to come back on a specimen I consider finished, this was an interesting experience, since I usually don't build skeletons with that much wiring although I kind of like the look of it.

It's now back in the university teaching collections, let's hope it stays in one piece this time!

Monday, March 3, 2014

Smooth-hound shark skeleton


Remember the common smooth-hound shark of my first post? Well, I recently finished it, so here are a few pictures of the finished specimen, and of the cleaning process as well.

 Common smooth-hound (Mustelus mustelus) skeleton.

And now a bunch of WIP pictures:

Tail region during the initial dissection. The fins were eventually detached for the body, but it is important to know their precise location along the vertebral axis first.

Head region, the same careful dissection is performed before separating the following "units": skull and jaws/gills (this is the tricky part)/dorsal fin/scapulocoracoid/pectoral fins.

Cleaned parts in ethanol prior to drying. Despite the small size of the specimen, I still took the skeleton apart in more manageable pieces to monitor carefully the drying process.

Sclerotic capsules, dorsal fin, tail, scapulocoracoid, neurocranium and part of the vertebral column during the drying process.

Gills ready for drying. This was the most difficult part to work with, and I could not get them fully intact.

Assembly of the skeleton, here a ventral view of the neurocranium and gills.

Above view. The scleral capsules have been added. A carefully bent brass rod is used as attachment and support for the scapulocoracoid cartilage.

Scapulocoracoid cartilage and pectoral fins added.

Dorsal fin ready to be attached to the skeleton. I used brass wire of different gauges for everything, but I'm toying with the idea of incorporating clear acrylic in the next one I prepare.

Getting there...

Pelvic fin  ready to be attached. A thin brass rod is fastened on the underside of the puboischiadic bar.

Finished skeleton, waiting to be mounted on its stand.

 Display stand in progress. I wanted to avoid the usual two support rods for something more original. My original idea completely failed, but then I was suggested to recreate the outline of the shark body using the wire, and I really liked the idea, and think it turned out really nicely. I had to add an additional support rod at the front though, a single central rod was not enough, and I placed it too far back on the stand, meaning it didn't look quite right if alone.


 Various views of the finished skeleton.

Really enjoyed working on this specimen, which was a fantastic learning experience. Of course it is far from perfect, but I'm looking forward to correct those mistakes on the next specimen I do.